In the evolving landscape of AV system integration, efficient equipment management and space optimization have become critical factors in successful project delivery. Whether you're designing a conference room, control room, or broadcast facility, understanding how to properly deploy a wall mount Audio Visual (AV) rack can significantly impact your project's efficiency, cost-effectiveness, and overall performance.
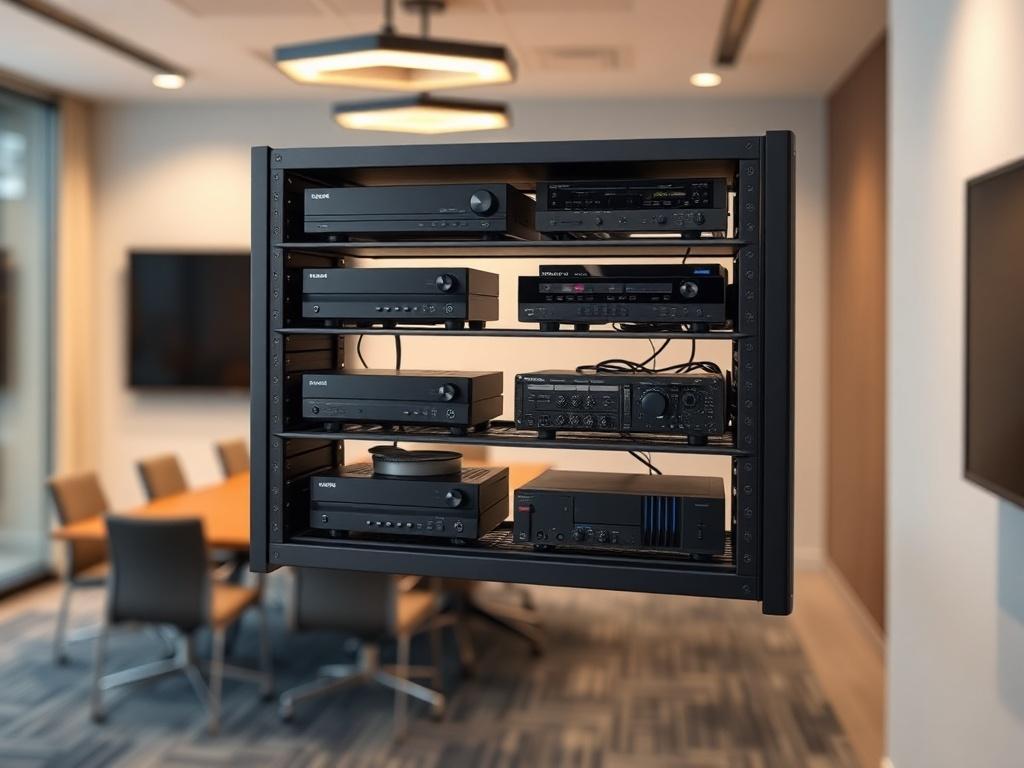
A wall mount Audio Visual (AV) rack provides AV integrators with a space-saving solution for housing network equipment, signal processors, power distribution units, and other AV components in environments where floor space is limited or premium. Beyond simple equipment storage, knowing how to mount Audio Visual (AV) rack on wall correctly ensures proper cable management, adequate ventilation, accessibility for maintenance, and compliance with installation standards.
This comprehensive guide explores everything AV integrators, system designers, and consultants need to know about wall-mounted racks from fundamental concepts to advanced planning workflows using modern AV design software like XTEN-AV's X-DRAW platform.
Key Takeaways
- Wall mount AV racks are vertical equipment enclosures designed to hold AV components while saving valuable floor space
- Ideal for small to medium installations requiring 6U to 22U of rack space
- Critical applications include conference rooms, huddle spaces, classrooms, retail environments, and control rooms
- Proper wall mounting requires structural assessment, adequate load-bearing capacity, and compliance with building codes
- Cable management, thermal considerations, and accessibility are essential planning factors
- Modern AV design automation tools like XTEN-AV's X-DRAW streamline rack layout planning, equipment documentation, and installation workflows
- Wall mount racks offer distinct advantages over floor standing racks in specific deployment scenarios
- Common mistakes include inadequate weight distribution, poor ventilation planning, and insufficient future expansion considerations
What Is a Wall Mount AV Rack?
A wall mount AV rack is a specialized equipment enclosure designed to securely attach to a wall surface while housing various Audio Visual components, networking devices, power management systems, and signal processing equipment. Unlike traditional floor standing racks, these mounting solutions maximize vertical space utilization without consuming valuable floor area.
Technical Definition
Wall mount racks are measured in standard rack units (RU or U), where one unit equals 1.75 inches (44.45mm) of vertical mounting space. These rack enclosures typically range from 4U to 22U in height, with the most common configurations being 6U, 9U, 12U, and 18U for typical AV installations.
The rack mounting system consists of vertical rails with standardized threaded mounting holes spaced according to EIA-310-D or IEC 60297 standards, ensuring universal compatibility with rack-mountable equipment from various manufacturers.
Core Functionality
Wall mounted AV racks serve multiple critical functions in modern AV system design:
- Equipment consolidation: Centralizes AV devices, network switches, media players, control processors, and power distribution in a single organized location
- Cable management: Provides integrated cable routing channels, wire management panels, and patch panel mounting areas
- Environmental protection: Shields sensitive electronic equipment from dust, physical damage, and unauthorized access
- Thermal management: Incorporates ventilation slots, fan mounting options, and proper airflow design to prevent equipment overheating
- Security: Offers lockable doors and panels to protect valuable AV infrastructure
Typical Capacity Range
Wall mount AV racks accommodate varying equipment loads:
- Small deployments (4U-9U): Support lightweight equipment up to 50-75 lbs
- Medium installations (12U-15U): Handle equipment loads of 75-150 lbs
- Larger configurations (18U-22U): Accommodate heavier systems up to 200+ lbs (with proper wall reinforcement)
Key Components of a Wall Mount AV Rack
Understanding the essential components helps AV integrators make informed decisions during system design and equipment specification.
1. Rack Frame and Mounting Rails
The structural foundation consists of:
- Vertical mounting rails with standardized hole patterns for universal rack mounting
- Horizontal support members providing structural rigidity
- Wall mounting brackets or mounting plates for secure attachment
- Adjustable mounting depth accommodations for various equipment dimensions
2. Doors and Access Panels
Access management features include:
- Front locking doors (solid, vented, or Plexiglass/acrylic)
- Rear access panels for cable termination and maintenance
- Removable side panels for enhanced accessibility
- Security locks to prevent unauthorized access
3. Cable Management System
Professional cable organization components:
- Vertical cable managers with D-rings or fingers
- Horizontal cable organizers for clean patch panel connections
- Cable entry/exit grommets or brush panels
- Velcro straps and cable ties mounting points
4. Ventilation and Cooling
Thermal management elements:
- Perforated doors and side panels for passive airflow
- Fan mounting locations (typically top-mounted exhaust)
- Ventilation slots strategically positioned for heat dissipation
- Temperature monitoring sensor mounting options
5. Power Distribution
Electrical infrastructure includes:
- Vertical or horizontal PDU (Power Distribution Unit) mounting
- Surge protection integration
- Remote power management capabilities
- Proper electrical grounding provisions
6. Shelves and Mounting Hardware
Additional equipment support:
- Non-rack-mountable equipment shelves
- Sliding shelves for equipment maintenance
- Universal mounting hardware (cage nuts, screws, washers)
- Adjustable mounting rails for flexible equipment positioning
When Should You Use a Wall Mount AV Rack?
Selecting between wall mount and floor standing rack configurations depends on multiple project-specific factors.
Ideal Use Cases
Conference Rooms and Huddle SpacesWall mounted racks excel in corporate meeting environments where:
- Floor space is premium or designated for furniture
- Equipment load is moderate (typically 8U-12U)
- Clean aesthetics matter for professional appearance
- AV equipment includes video switchers, matrix switchers, control processors, and network switches
Educational environments benefit from wall mounting because:
- Equipment remains accessible but secure from student interference
- Installation height can be optimized for instructor or technician access
- Limited floor space maximizes room functionality
- AV components are protected from accidental damage
Commercial spaces utilize wall mount racks for:
- Digital signage media players and content management systems
- Background music and audio distribution equipment
- Network infrastructure supporting POS and guest services
- Security camera recording equipment and network video recorders
Home theaters and small office installations where:
- Equipment density is low to moderate (6U-12U)
- Aesthetic integration with interior design is important
- Floor space preservation is critical
- Home automation controllers and media servers require housing
Dedicated technical areas that benefit from:
- Multiple wall rack deployment for distributed equipment placement
- Proximity to specific signal sources or destinations
- Supplement to primary floor standing racks
- Quick access to frequently maintained devices
When NOT to Use Wall Mount Racks
Certain scenarios favor floor standing rack solutions:
- Heavy equipment loads exceeding wall load-bearing capacity (200+ lbs)
- Large equipment quantities requiring 24U or more rack space
- Frequent equipment changes demanding easy rear access
- Environments with inadequate wall structural support
- Data center deployments with high-density server equipment
- Installations requiring deep equipment (24+ inches) like blade servers
- Applications needing extensive horizontal cable management
Wall Mount AV Rack vs Floor Standing AV Rack
Understanding the comparative advantages helps AV system designers make optimal deployment decisions.
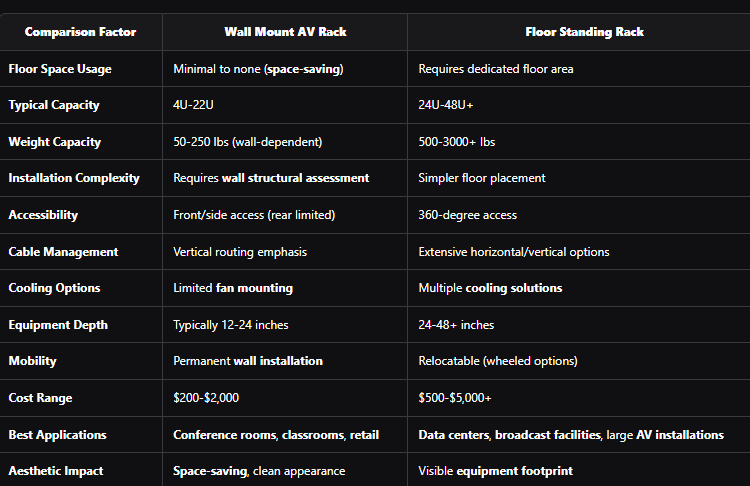
Hybrid Deployment Strategy
Many AV integrators employ combined approaches:
- Wall mount racks for distributed edge equipment
- Floor standing racks for central equipment rooms
- Wall racks in client-facing spaces, floor racks in technical areas
- Strategic placement based on equipment type and access requirements
Benefits of Wall Mount AV Racks for AV Integrators
Professional AV integration firms leverage wall mounted rack solutions to deliver superior project outcomes.
1. Space Optimization
Wall mounting eliminates floor footprint, particularly valuable in:
- Urban installations with premium real estate costs
- Retrofit projects in existing facilities
- Multi-purpose rooms requiring flexible space usage
- Small form factor deployments
2. Cost-Effective Deployment
Economic advantages include:
- Lower equipment rack purchase costs versus floor standing alternatives
- Reduced HVAC requirements in smaller enclosed spaces
- Simplified installation labor in appropriate scenarios
- Less complex electrical infrastructure
3. Enhanced Security
Physical security benefits:
- Elevated equipment placement above casual reach
- Locking mechanisms preventing unauthorized access
- Reduced vandalism risk in public spaces
- Tamper-evident access control
4. Improved Cable Management
Organized cabling advantages:
- Vertical cable routing naturally aligned with equipment orientation
- Reduced cable lengths from sources to rack-mounted devices
- Cleaner installation appearance
- Simplified troubleshooting and maintenance
5. Flexible Installation Options
Deployment versatility:
- Multiple mounting locations within a space
- Distributed equipment placement near signal sources
- Phased installation capability
- Easy integration with existing infrastructure
6. Professional Aesthetics
Visual presentation benefits:
- Clean, organized equipment appearance
- Matching enclosure finishes to interior design
- Concealed cabling and equipment clutter
- Client-impressive installation quality
7. Maintenance Accessibility
Service advantages:
- Equipment face directly accessible for monitoring
- Front panel adjustments without rear access
- Clear equipment labeling visibility
- Simplified equipment identification
8. Standardized Design Approach
Integration efficiency:
- Repeatable installation templates across projects
- Standardized equipment specifications
- Predictable project timelines
- Consistent documentation practices
Common Mistakes to Avoid When Using Wall Mount AV Racks
Even experienced AV integrators can encounter pitfalls without proper planning.
1. Inadequate Wall Structure Assessment
Critical error: Installing heavy equipment racks on insufficient load-bearing walls.
Best practices:
- Conduct structural load capacity evaluation before specification
- Use stud finders to locate solid mounting points
- Install backing boards or reinforcement for drywall installations
- Consult structural engineers for heavy equipment (150+ lbs)
- Use appropriate mounting hardware (lag bolts, concrete anchors)
2. Insufficient Ventilation Planning
Critical error: Creating thermal hotspots through poor airflow design.
Best practices:
- Calculate total equipment heat dissipation (BTU/hr or watts)
- Specify vented doors and panels for passive cooling
- Plan active cooling solutions (fan mounting) when needed
- Maintain minimum clearances around rack enclosure
- Avoid installations in confined spaces without air circulation
3. Poor Cable Management Design
Critical error: Inadequate cable routing planning leading to disorganized installations.
Best practices:
- Specify racks with integrated cable management features
- Plan cable entry/exit points during system design
- Document cable routing paths in rack elevation drawings
- Use proper cable labeling standards
- Account for service loop requirements
4. Ignoring Future Expansion Needs
Critical error: Specifying rack capacity with no growth headroom.
Best practices:
- Plan for 20-30% future expansion capacity
- Document available rack units for additions
- Consider equipment upgrade cycles in initial design
- Verify power distribution capacity for growth
- Maintain updated as-built documentation
5. Improper Equipment Sequencing
Critical error: Illogical equipment placement creating maintenance difficulties.
Best practices:
- Position heavy equipment near bottom for weight distribution
- Place frequently accessed devices at optimal heights
- Group related equipment logically
- Consider cable routing paths in equipment sequence
- Leave adequate spacing for ventilation and access
6. Inadequate Power Distribution Planning
Critical error: Insufficient electrical capacity or poor PDU placement.
Best practices:
- Calculate total power consumption including growth
- Specify appropriate PDU capacity and outlet quantities
- Consider redundant power for critical systems
- Plan power cord routing to avoid cable congestion
- Verify electrical circuit capacity with facility management
7. Neglecting Equipment Depth Requirements
Critical error: Purchasing shallow racks for deep equipment.
Best practices:
- Verify maximum equipment depth requirements before rack selection
- Account for rear cable management space needs
- Consider patch panel and cable bundling depth
- Specify adjustable mounting rails for flexibility
8. Poor Documentation Practices
Critical error: Inadequate as-built documentation hampering future maintenance.
Best practices:
- Create detailed rack elevation diagrams
- Maintain updated equipment lists and serial numbers
- Document cable labeling schemes
- Provide power distribution documentation
- Use modern AV design software for professional documentation
How XTEN-AV's X-DRAW Software Simplifies Wall Mount Rack Planning
Modern AV system design demands sophisticated tools that accelerate workflows while improving accuracy and consistency. XTEN-AV's X-DRAW platform represents a specialized AV design automation solution purpose-built for AV integrators, consultants, and system designers.
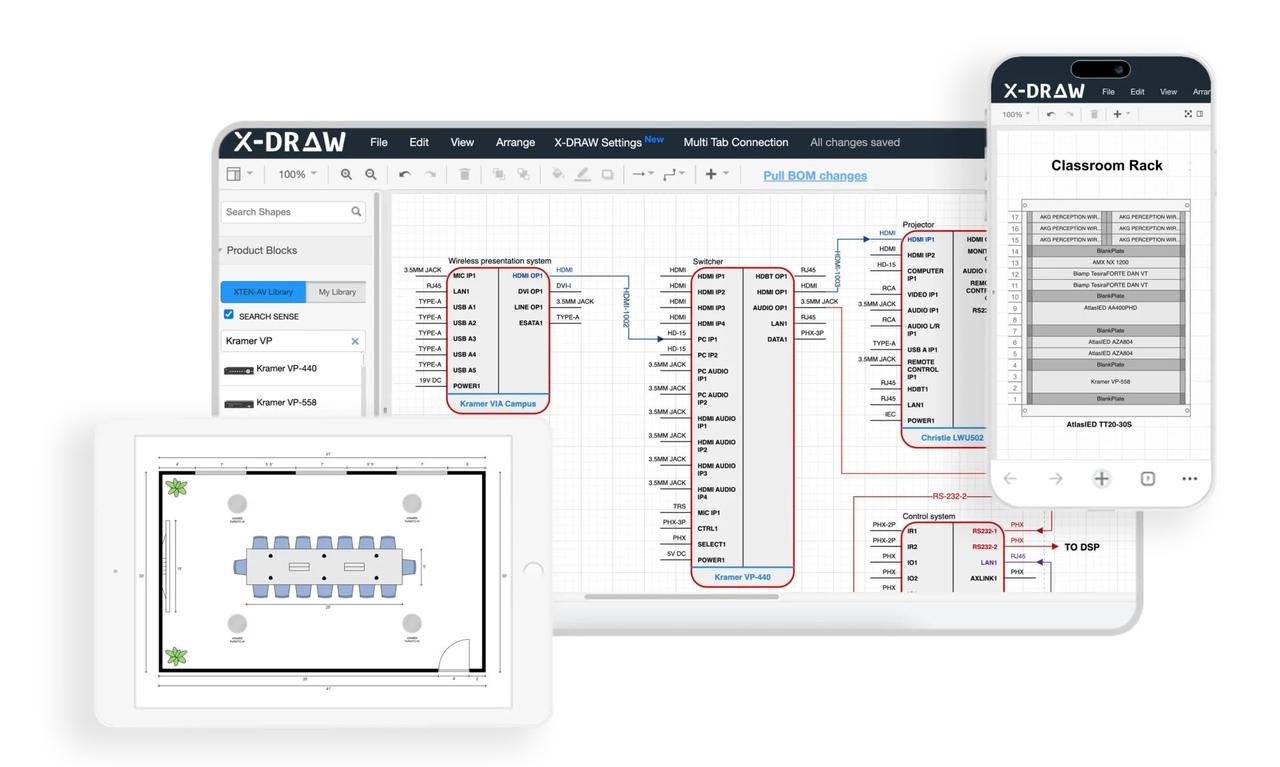
X-DRAW is a cloud-based AV design software that transforms traditional CAD-intensive workflows into streamlined, automated processes. Unlike generic design tools, X-DRAW focuses specifically on AV integration workflows, including rack layout planning, signal flow diagramming, line schematics, and front elevation design.
For wall mount AV rack planning, X-DRAW eliminates manual drafting tedium while ensuring installation-ready documentation that integrates seamlessly with project management, procurement, and installation execution.
Key Features for Wall Mount Rack Planning
1. Automated Rack Layout GenerationX-DRAW automatically creates rack layouts based on equipment added to the project BOM (Bill of Materials), significantly reducing manual drafting time and minimizing design errors. Integrators can generate organized rack elevations with just a few clicks, immediately visualizing how AV components, network equipment, and power distribution units fit within the specified rack enclosure.
This automation ensures consistency between equipment specifications and installation documentation, eliminating discrepancies that commonly occur in manual workflows.
2. Intelligent Rack Elevation DiagramsThe platform generates detailed rack elevation drawings that help AV designers visualize equipment placement, spacing, airflow considerations, and installation requirements before deployment. These elevation diagrams include:
- Precise rack unit (RU) positioning for each device
- Equipment dimensions and mounting specifications
- Cable connection points and port locations
- Weight distribution visualization for proper load management
- Ventilation spacing recommendations
Equipment added to the bill of materials can automatically populate rack layouts, ensuring consistency between procurement, documentation, and installation plans while reducing duplicate work. This integration means:
- Specification changes immediately reflect in rack diagrams
- Equipment quantities remain synchronized across project documents
- Procurement teams and installation crews work from identical information
- Project revisions require minimal documentation updates
Unlike generic CAD platforms, X-DRAW is built specifically for AV integrators and includes AV-focused automation for rack layouts, signal flow diagrams, line schematics, and front elevation designs. The platform understands AV equipment characteristics, signal types, connection standards, and installation best practices.
This specialization accelerates design workflows while incorporating industry knowledge directly into the design automation process.
5. Front Elevation and Rack DocumentationUsers can generate automated front elevation diagrams alongside rack layouts, making it easier for installers and technicians to understand equipment positioning inside wall-mounted racks. Front elevations show:
- Device front panel appearances
- Control interface locations
- Status indicator positions
- Physical equipment relationships
- User interaction points
X-DRAW provides access to a large manufacturer product database, allowing designers to quickly drag, drop, and configure AV devices inside rack designs without creating components manually. The library includes:
- Thousands of manufacturer-specific equipment models
- Accurate dimensional data and mounting specifications
- Connection port information and signal types
- Power consumption specifications
- Equipment weight data for load calculations
Designers can customize device blocks, connector settings, port colors, labels, and symbols, helping create cleaner and more installation-ready wall mount rack diagrams. Customization capabilities include:
- Custom device representations for proprietary equipment
- Standardized labeling conventions across projects
- Color-coding schemes for different signal types
- Project-specific symbolization standards
- Reusable template libraries
The software automates cable labeling and signal-flow documentation, making wall mount rack planning more accurate and reducing confusion during installation and maintenance. Automated labeling ensures:
- Consistent cable identification schemes
- Source-to-destination traceability
- Installation crew clarity
- Simplified troubleshooting processes
- Professional documentation standards
Rack layouts can be exported in formats such as PDF, PNG, SVG, Visio, AutoCAD, XML, and HTML, simplifying collaboration with consultants, contractors, and clients. This flexibility supports:
- Client presentations in accessible formats
- CAD integration with architectural drawings
- Web-based project documentation portals
- Print production for installation packages
- Digital archiving and version control
Because X-DRAW operates on a cloud platform, multiple stakeholders can review, update, and manage rack designs from anywhere, improving project coordination and version control. Cloud-based workflows enable:
- Real-time collaboration among distributed teams
- Instant design review cycles
- Centralized project documentation repositories
- Device-agnostic access (desktop, tablet, mobile)
- Automatic backup and version history
The platform includes AI-powered drawing features that can automate design modifications, cable adjustments, and layout refinements, helping AV teams accelerate rack planning workflows. Artificial intelligence capabilities include:
- Intelligent equipment sequencing recommendations
- Optimized cable routing suggestions
- Conflict detection and resolution
- Best practice enforcement
- Design pattern recognition and application
When project requirements change, designers can quickly update rack layouts and synchronize documentation, avoiding the lengthy redraw process common in traditional CAD-based workflows. This agility means:
- Client change requests processed rapidly
- Equipment substitutions updated across all project documents
- Installation timelines maintained despite design changes
- Reduced project management overhead
- Improved client satisfaction through responsiveness
Pros of X-DRAW for Wall Mount Rack Planning
Advantages for AV integration firms:
- Dramatic time savings: Automated workflows reduce rack design time by 60-80%
- Improved accuracy: Eliminates manual transcription errors between BOM and rack layouts
- Professional documentation: Consistent, installation-ready drawings enhance firm reputation
- Scalability: Handles projects from single wall racks to complex multi-rack systems
- Team collaboration: Cloud-based platform supports distributed workflows
- Client confidence: Polished documentation demonstrates professionalism and expertise
- Reduced rework: Design automation catches errors before installation
- Knowledge capture: Reusable templates and libraries standardize best practices
- Integration efficiency: Connects design, procurement, and installation phases
- Future-ready: Regular updates add new features and manufacturer products
Cons and Considerations
Potential limitations to consider:
- Learning curve: Team requires training on platform-specific workflows
- Subscription cost: Ongoing expense versus one-time CAD software purchases
- Internet dependency: Cloud platform requires reliable connectivity
- Feature specificity: Focuses on AV workflows, not general-purpose CAD
- Migration effort: Transitioning from established CAD workflows takes planning
Best For
X-DRAW is ideally suited for:
- AV integration firms seeking to modernize design workflows
- Consultants requiring professional client deliverables
- System designers handling multiple concurrent projects
- Organizations standardizing documentation practices
- Teams prioritizing collaboration and version control
- Firms specializing in wall mount rack and distributed AV installations
- Integrators pursuing efficiency and reduced project timelines
EXPLORE XTEN-AV 15 DAYS FREE TRIAL
Frequently Asked Questions
What size wall mount rack do I need for a conference room?Most conference room AV systems require 9U to 12U wall mount racks, accommodating typical equipment including video switchers (1-2U), control processors (1U), network switches (1U), power distribution (1-2U), and cable management (2-3U) with room for expansion.
Can I install a wall mount rack on drywall?Yes, but only with proper reinforcement. Use backing boards secured to wall studs, heavy-duty toggle bolts, or install plywood backer during construction. Drywall alone cannot support equipment loads exceeding 50 lbs safely.
How much weight can a typical wall mount rack hold?Load capacity varies by rack model and wall structure. Standard wall mount racks support 50-150 lbs on properly reinforced walls, while heavy-duty models handle 200+ lbs with appropriate structural mounting. Always verify manufacturer specifications and wall load-bearing capacity.
What is the standard depth for a wall mount AV rack?Common depths range from 12 inches (shallow/network equipment) to 24 inches (full-depth AV equipment). Most AV integrators specify 18-inch depth racks as a versatile standard accommodating most rack-mountable AV devices and allowing adequate rear cable management space.
Do wall mount racks need cooling fans?Cooling requirements depend on total equipment heat dissipation. Passive ventilation (perforated doors/panels) suffices for low-power loads (
What's the difference between open frame and enclosed wall mount racks?Open frame racks provide maximum airflow and accessibility but no equipment protection or security. Enclosed racks offer dust protection, security, and professional aesthetics but require ventilation planning. Choose based on environment, security needs, and equipment sensitivity.
How do I calculate power requirements for my wall mount rack?Sum all equipment power consumption (watts or VA ratings from equipment specifications), add 20% safety margin, and ensure PDU capacity exceeds this total. Also verify electrical circuit capacity at the installation location supports the calculated load.
Can I mount network servers in a wall mount rack?Light 1U or 2U servers are suitable for wall mounting if total equipment weight remains within rack and wall capacity. Heavy blade servers or dense server configurations require floor standing racks due to weight and depth requirements.
What cable management accessories do I need?Essential cable management includes vertical cable managers (both sides), horizontal organizers between devices, cable entry/exit panels, Velcro cable wraps, and cable labeling systems. Plan for 2-3U of rack space dedicated to cable organization.
How high should I install a wall mount rack?Position equipment face at comfortable working height, typically 48-60 inches from floor to rack center. Consider technician access, ceiling height limitations, cable routing paths, and physical security requirements when determining optimal mounting height.
Conclusion
Wall mount AV racks represent an essential equipment deployment strategy for modern AV integrators, offering space-saving benefits, cost-effective installation, and professional aesthetics across diverse applications from conference rooms to control rooms. Success in wall mount rack planning requires careful consideration of structural requirements, equipment specifications, thermal management, cable organization, and future expansion needs.
Understanding when to deploy wall-mounted versus floor standing racks—and recognizing the comparative advantages of each approach—enables system designers to optimize project outcomes while meeting client expectations for functionality, reliability, and appearance.
The integration of advanced AV design automation tools like XTEN-AV's X-DRAW transforms traditional CAD-intensive workflows into streamlined, intelligent processes that accelerate design cycles, improve documentation accuracy, and enhance collaboration across project stakeholders. By automating rack layout generation, equipment sequencing, cable labeling, and signal flow documentation, platforms like X-DRAW empower AV integration firms to deliver superior wall mount rack installations with greater efficiency and consistency.
As the AV industry continues evolving toward more complex system integration requirements, distributed equipment architectures, and demanding client expectations, mastering wall mount rack deployment—supported by modern design automation and planning tools—becomes increasingly critical to competitive differentiation and project success.
Whether you're an experienced AV integrator standardizing installation practices, a consultant specifying equipment enclosures, or a system designer exploring space-optimized solutions, the principles, best practices, and technological tools outlined in this guide provide a comprehensive foundation for professional wall mount AV rack planning and implementation.